I recently purchased a FitBark dog activity tracker. I always check now to see if there is some kind of API available with products like these, so that you can capture and use the data in ways other than the manufacturer intended - it turns out with FitBark there is. Although you might think the primary purpose of a device like this is to see just how much running around your dog does, you kind of already know that - though the ability to compare that to other dogs can either make you feel smug, or guilty.
Actually, the really interesting benefit is finding out just how settled a dog is when you’re not there, and at night. FitBart has a sleep score metric which gives you a measure of how good a nights sleep your dog has had. I’ve found this to correlate well with any overnight mischief if you know what I mean. By using a WiFi base station, the FitBark periodically synchronises over Bluetooth even when your phone is not nearby. This works really well.
I was hoping that IFTTT would have integrated FitBark because they seem to have pretty much everything else, but they don’t. After searching, I could find no way to access the API without doing some of my own coding, so that’s what I did. This got me inspired to integrate it with Comb9.
At the moment I’ve created two Comb9 elements, one to get basic dog info, which includes battery charge and last synchronisation time, and the other to get historical activity statistics. This post shows you how to use this functionality to get a Pushover notification to your phone when the FitBark battery is running low. Of course, there is much more you can do with it than this!
FitBark Low Battery Notification Tutorial
This tutorial shows you how to use Comb9 to create a low battery notification for your FitBark.
Step 1 Create an account on Comb9 if you don’t already have one.
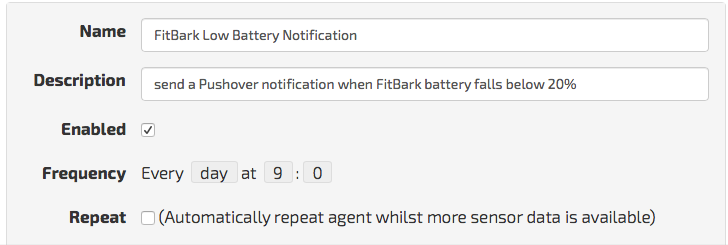
Step 2 Create a new agent with the following details. I’ve set this to run daily at 9 am:
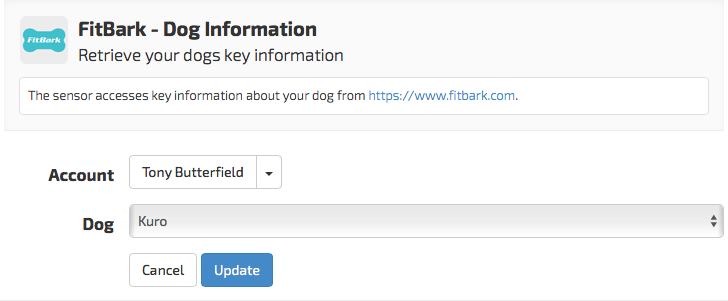
Step 3 Add the FitBark Dog Information element and configure it. You’ll need to authorise Comb9 to access your FitBark account. Then you’ll find your dog, or dogs will appear in the drop-down:
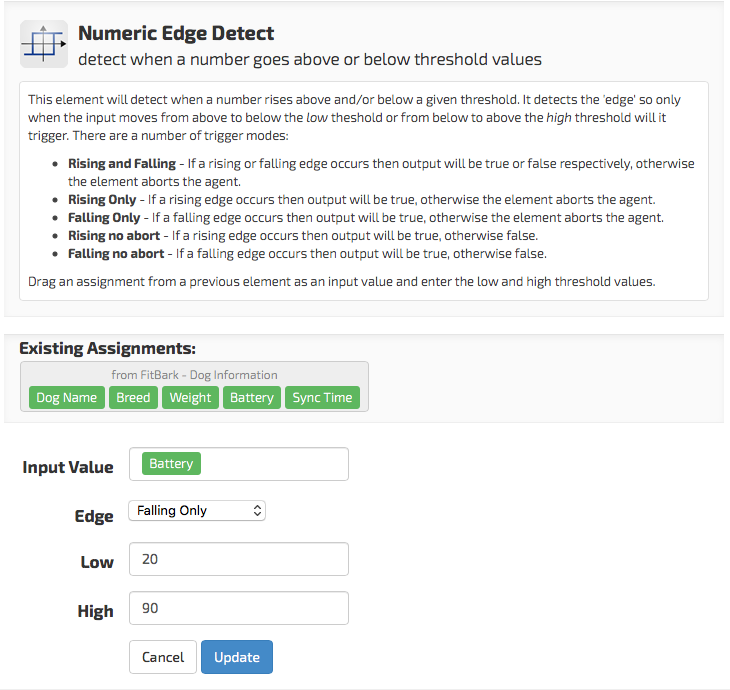
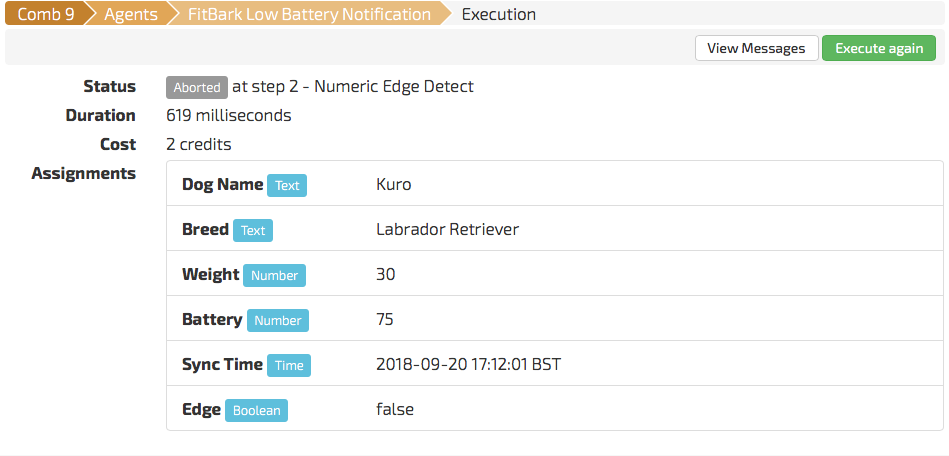
Step 4 Add the Numeric Edge Detect element. We use this to test when the battery level drops below our configured threshold - 20%. You’ll need to drag and drop the Battery assignment from Existing Assignments onto the Input Value field. This element will abort execution of the agent if the battery level doesn’t drop from above the threshold to below. This means the next element, the pushover notification, won’t actually run unless this occurs.
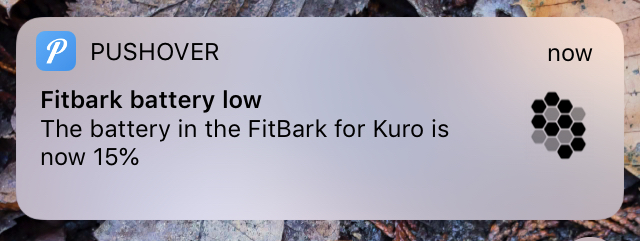
Step 5 Add the Send Pushover Notification element. (If you don’t use the Pushover App then you can always replace this step with the Send Email element.) You’ll need to authorise Comb9 to access your Pushover account first. Then you’ll be able to select a notification sound and choose a device to send the notifications too. You can specify the title and message however you want, dragging assignments into them as desired:

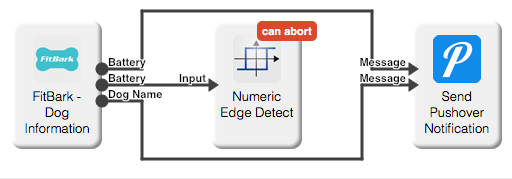
Step 6 That’s it! Your agent should now have a schematic like this:
You can test your agent by clicking the Execute Now button in the top right. You should expect it to abort like this:
But when it does eventually run, and that won’t be very often as the battery lasts up to six months, you’ll see:
Hope this makes sense? Any questions, ask below.